How to Bulk Import Products Into Lightspeed R Series
TL;DR
Lightspeed R Series uses a two-step CSV import process: one file for items (your product catalog) and another for purchase orders (costs, quantities, and receiving). If you'd rather skip building these spreadsheets by hand, Ohavah generates both CSVs from your supplier invoices automatically.
Turn supplier invoices into products instantly
Skip the manual data entry. Upload a PDF, get ready-to-import products.
Lightspeed R Series is a popular POS for boutiques and specialty retailers, but getting products into the system in bulk is not exactly intuitive. Unlike platforms with a single CSV upload, Lightspeed R Series splits the job into two separate imports with two different templates. This guide walks through both steps so you can get new inventory loaded correctly the first time.
Why Two Imports?
Lightspeed R Series separates product catalog data from purchasing data. Your items (names, SKUs, prices, categories) live in one system. Your purchase orders (costs, quantities, vendor info) live in another. To fully set up new products with both pricing and stock levels, you need to import into both.
Step 1 creates the items in your catalog with retail prices and product details. Step 2 creates a purchase order that records what you paid and how many units you ordered, which is how Lightspeed tracks cost of goods and inventory quantities.
Step 1: The Item Import Template
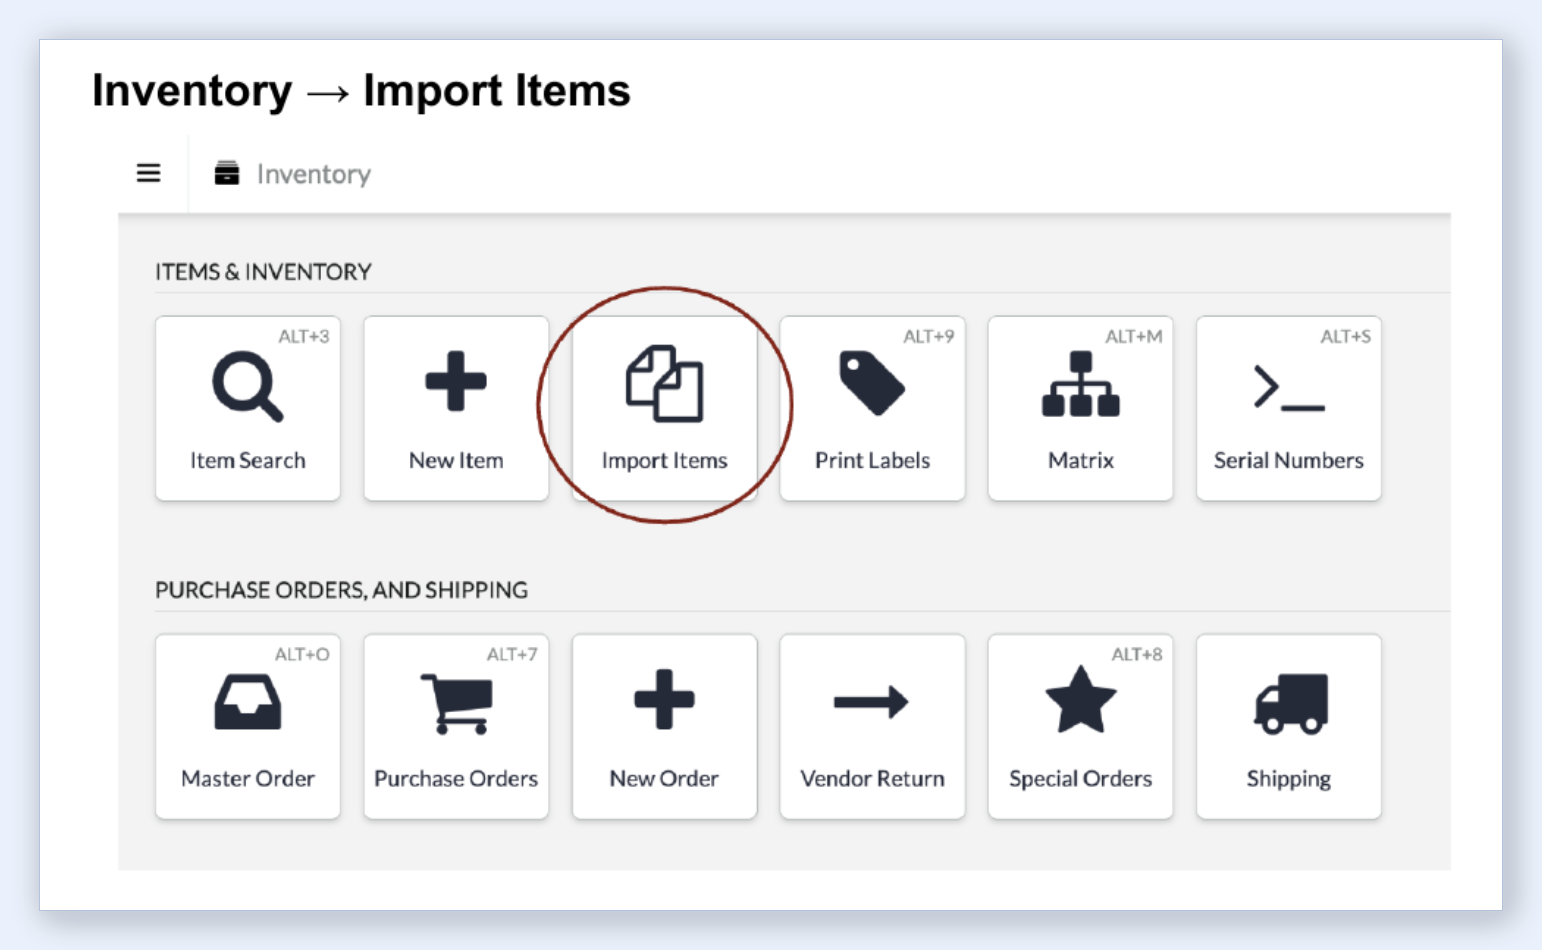
The Item Import CSV creates or updates items in your Lightspeed catalog. You will find this under Inventory > Import Items in the Lightspeed admin.
Key columns
| Column | What it does |
|---|---|
| Description | Product name that appears in your POS and on receipts. |
| System ID | Lightspeed's internal identifier. Leave blank for new items; used for matching when updating existing ones. |
| Custom SKU / Manufacturer SKU | Your internal SKU and the vendor's style code. |
| UPC / EAN | Barcode numbers, if applicable. |
| Vendor / Vendor ID | Vendor name and identifier in Lightspeed. |
| Vendor Cost / Default - Price | Wholesale cost and retail selling price. |
| Brand | Vendor or brand name. |
| Matrix Description / Attribute Set | For items with variants: the parent product name and which axes to use (e.g., "Color/Size"). |
| Attribute 1 / 2 / 3 | Variant values like color, size, or other options. |
| Category / Subcategory | Product category hierarchy in Lightspeed (e.g., "Apparel > Sweater"). |
The file must be .csv or .xlsx format and can contain up to 10,000 items per import.
How to import
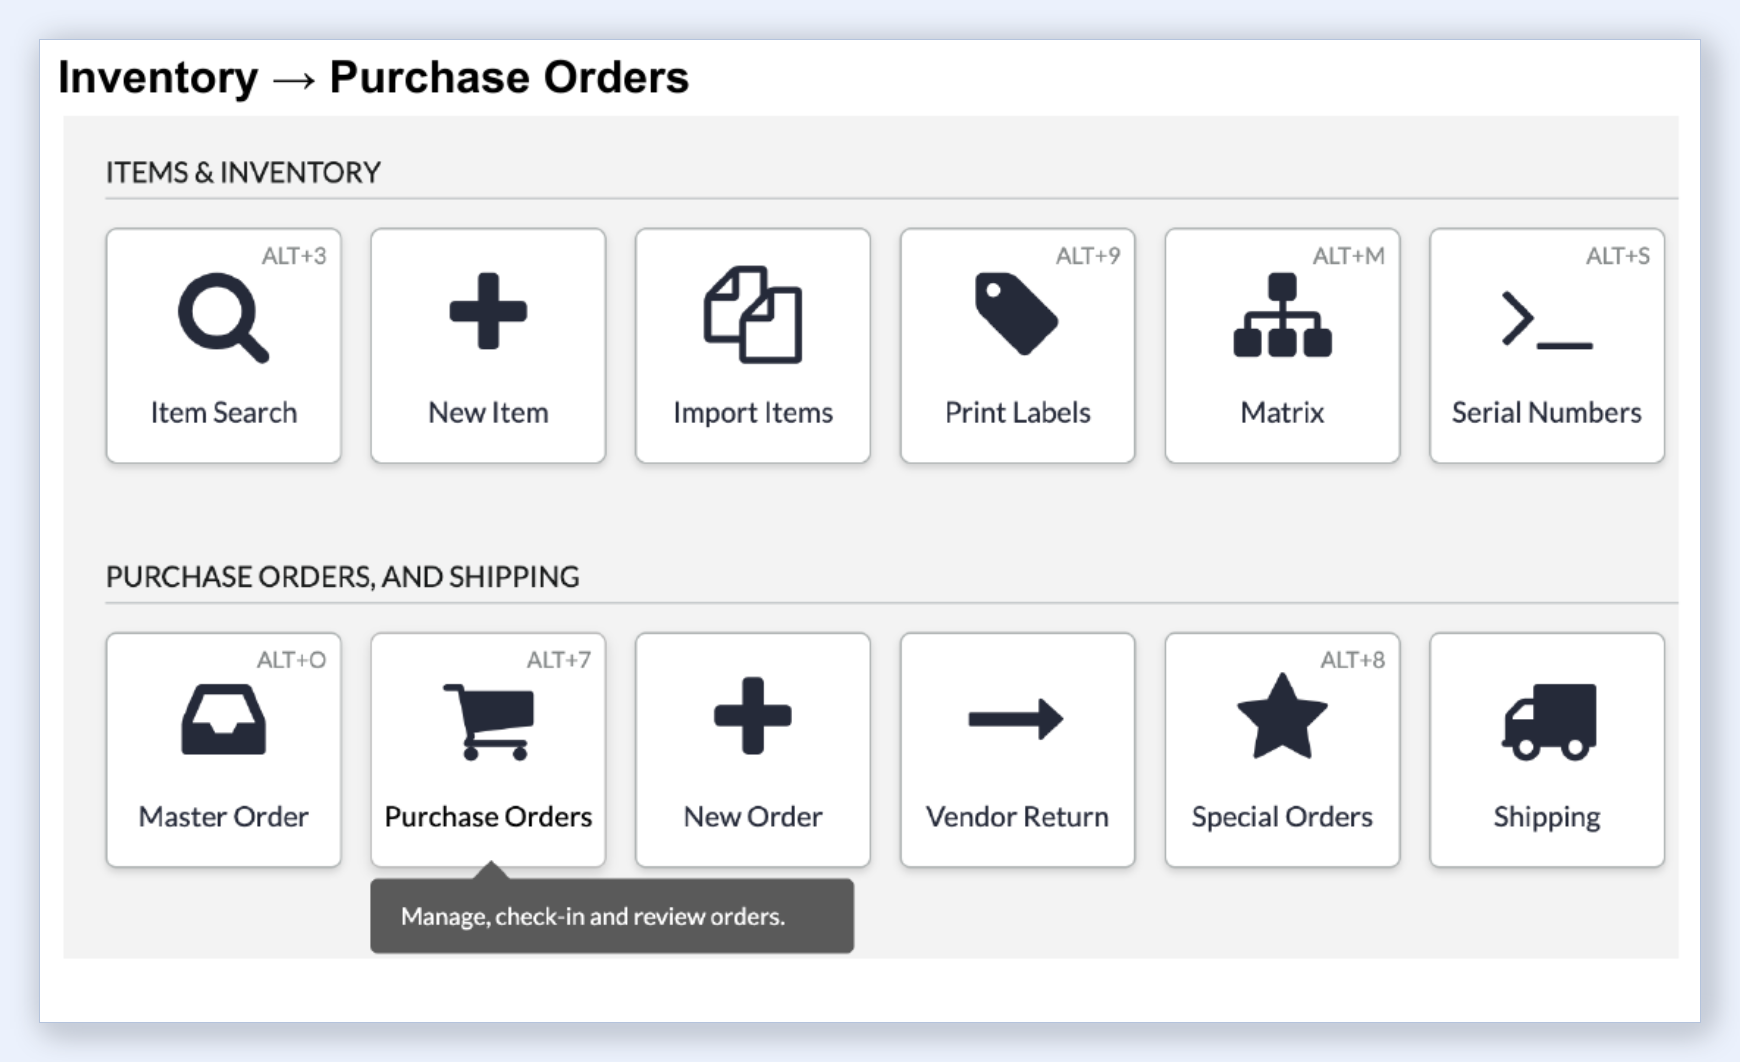
- Go to Inventory > Import Items
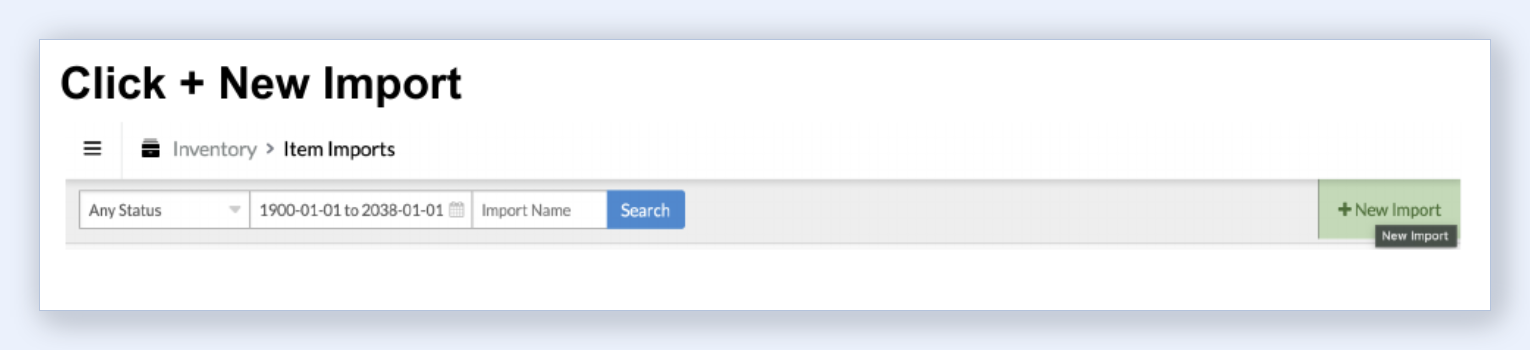
- Click + New Import
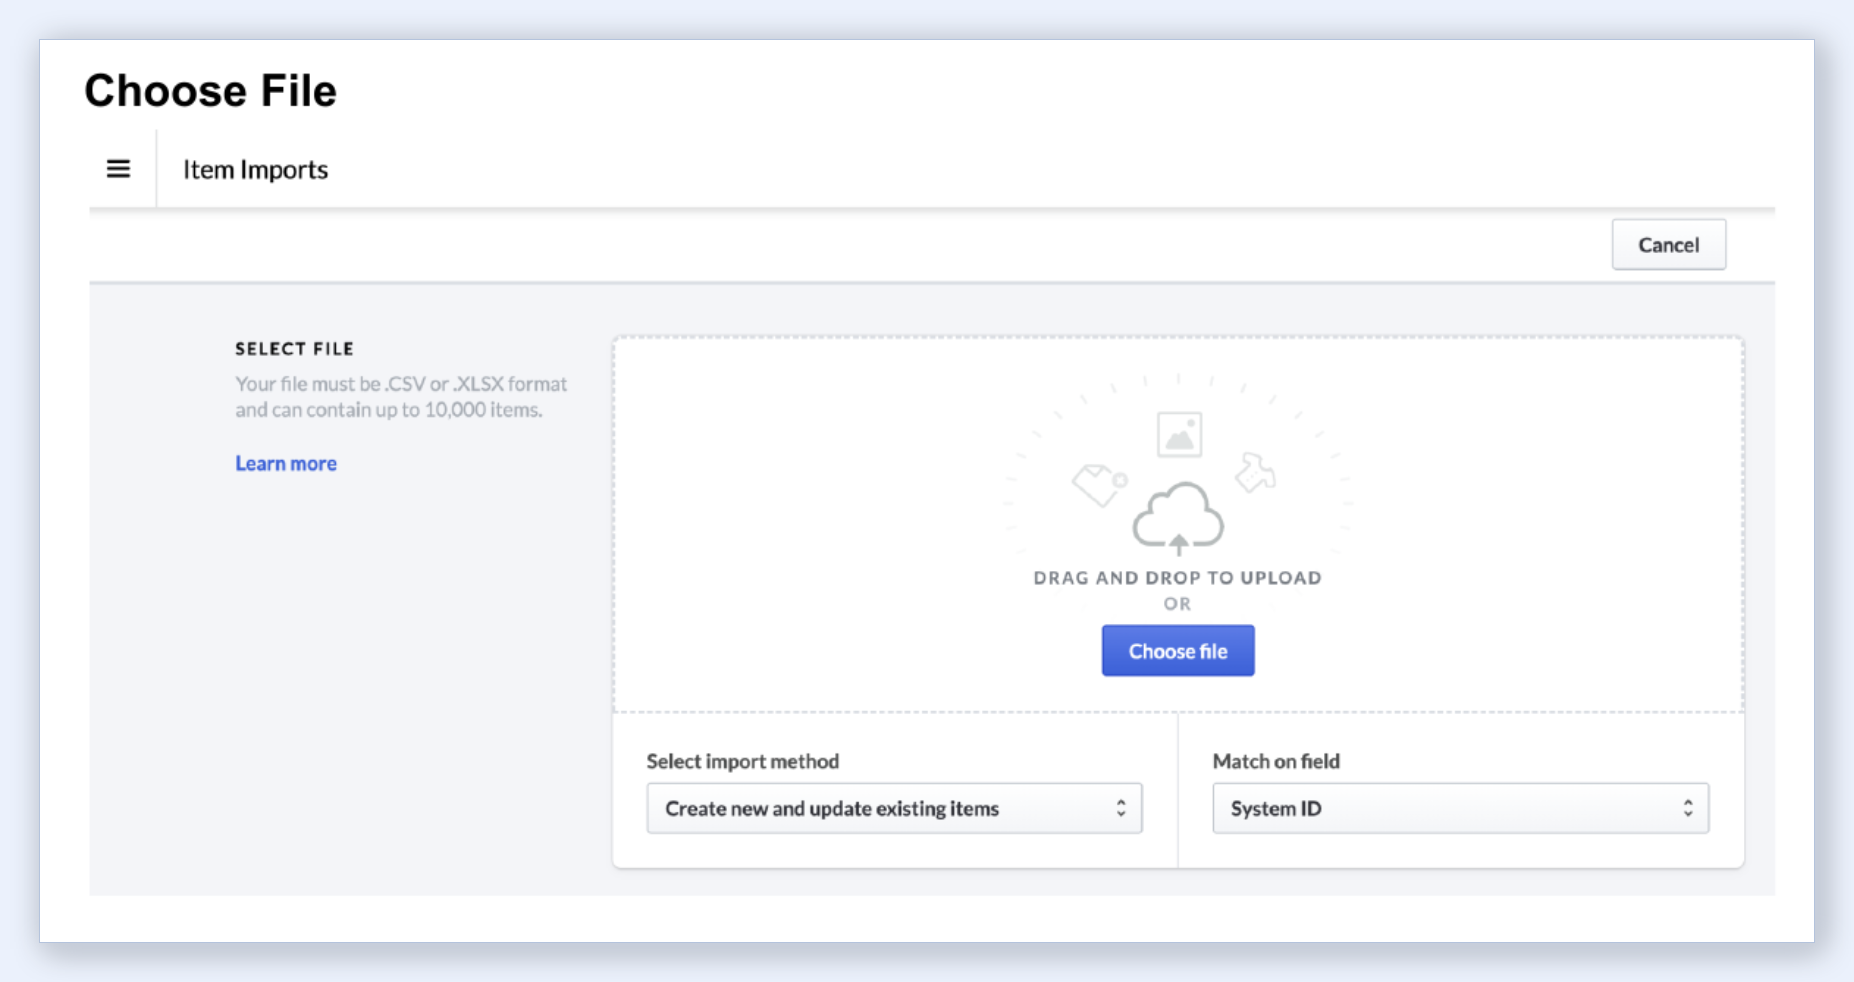
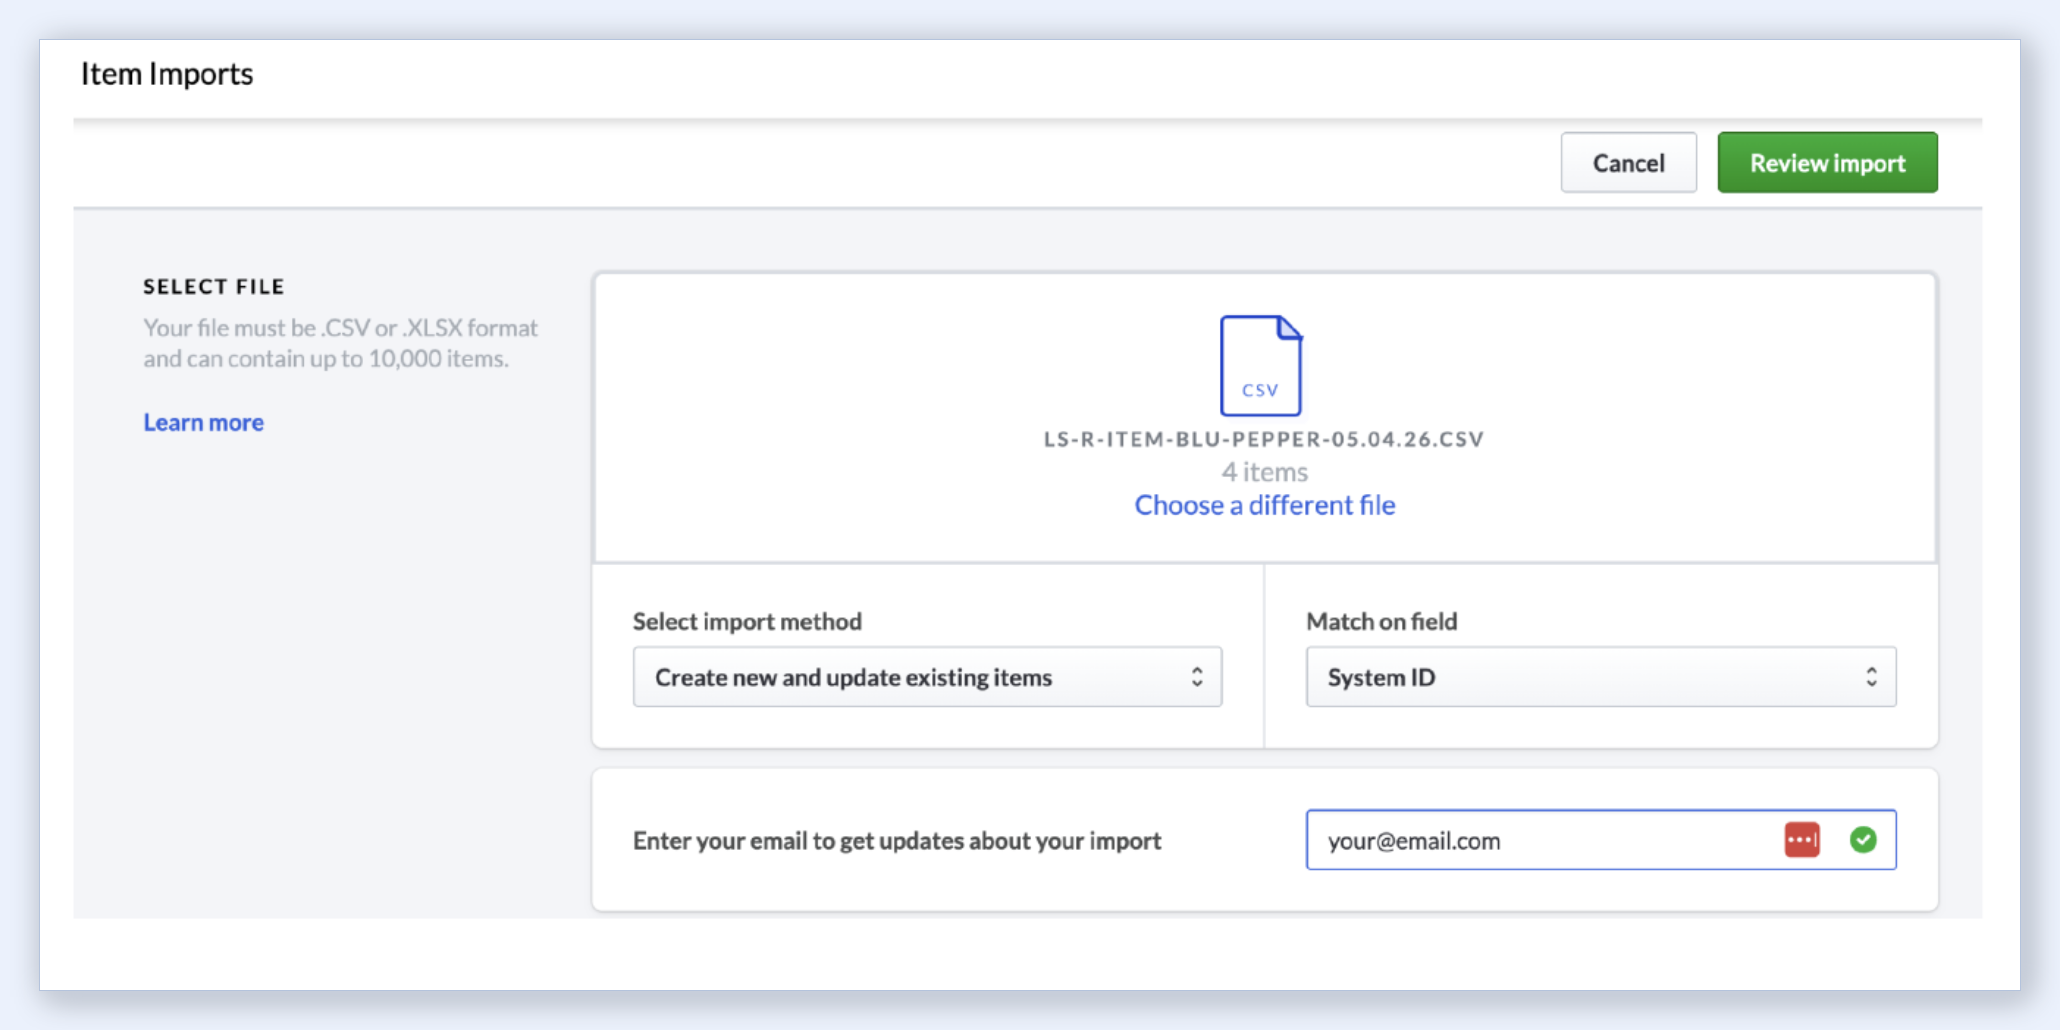
- Select your CSV file (drag and drop or click "Choose file"). Ohavah names it something like
LS-R-item-vendor-name-05.04.26.csv. Set the import method to "Create new and update existing items" and "Match on field" to System ID.
- Once your file is loaded, you will see the file name and item count. Click Review Import.
- Review the summary showing new items, updated items, new vendors, brands, and categories. Click Import Items.
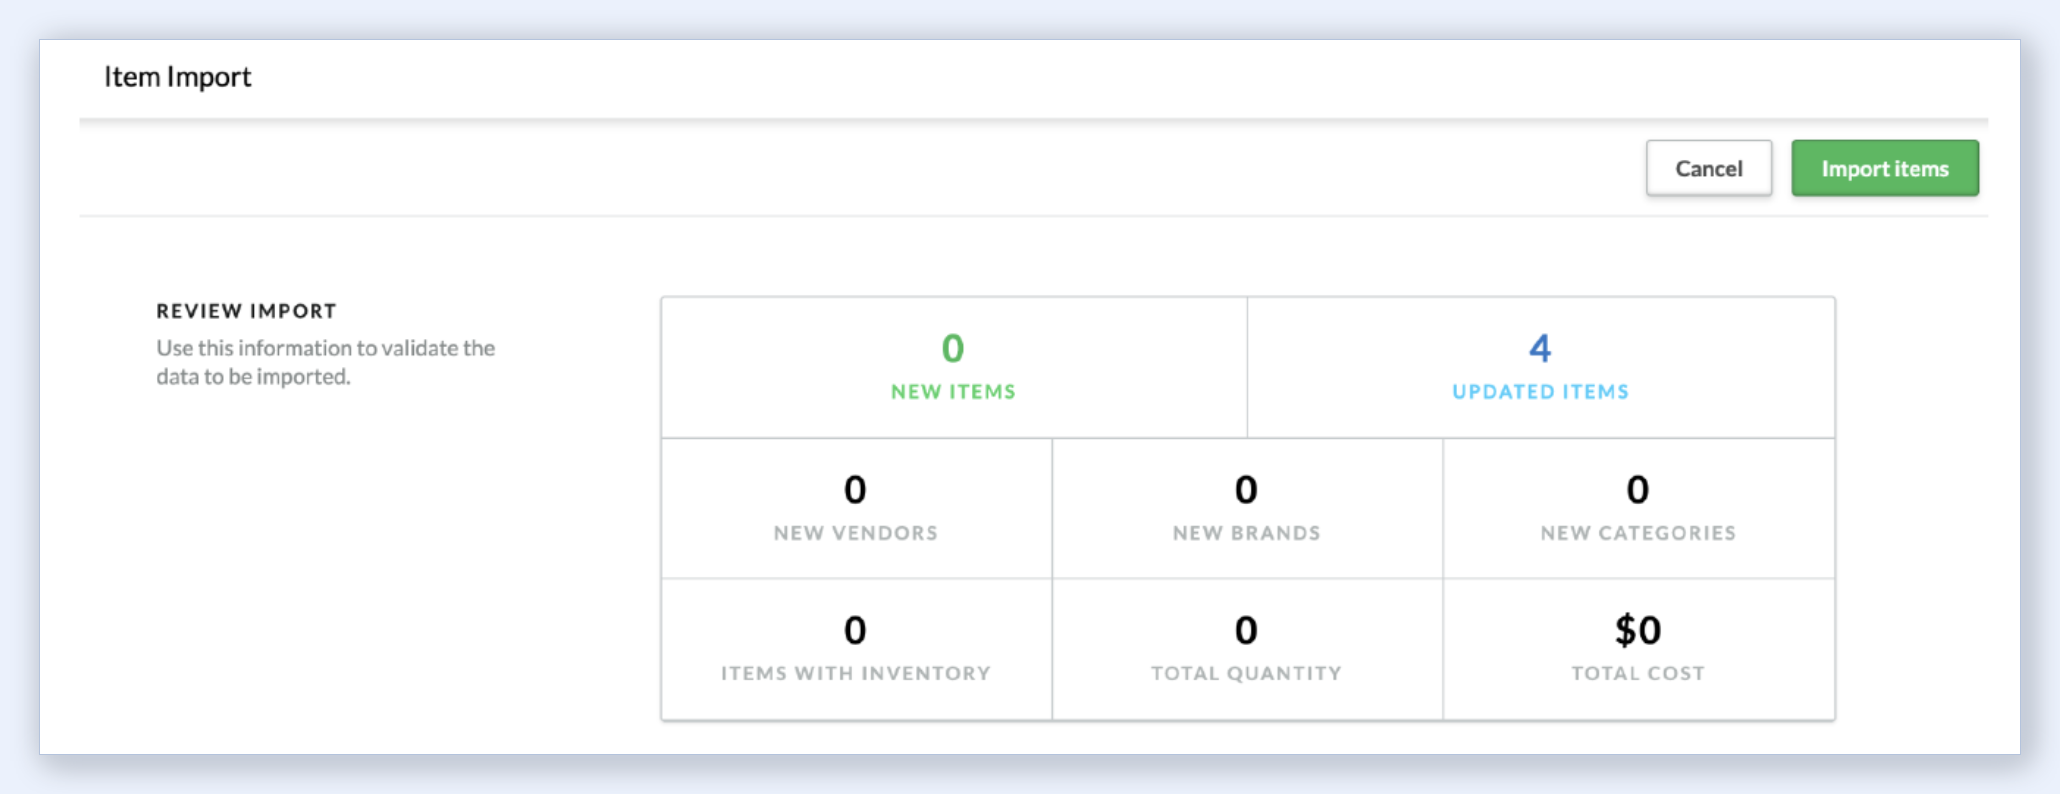
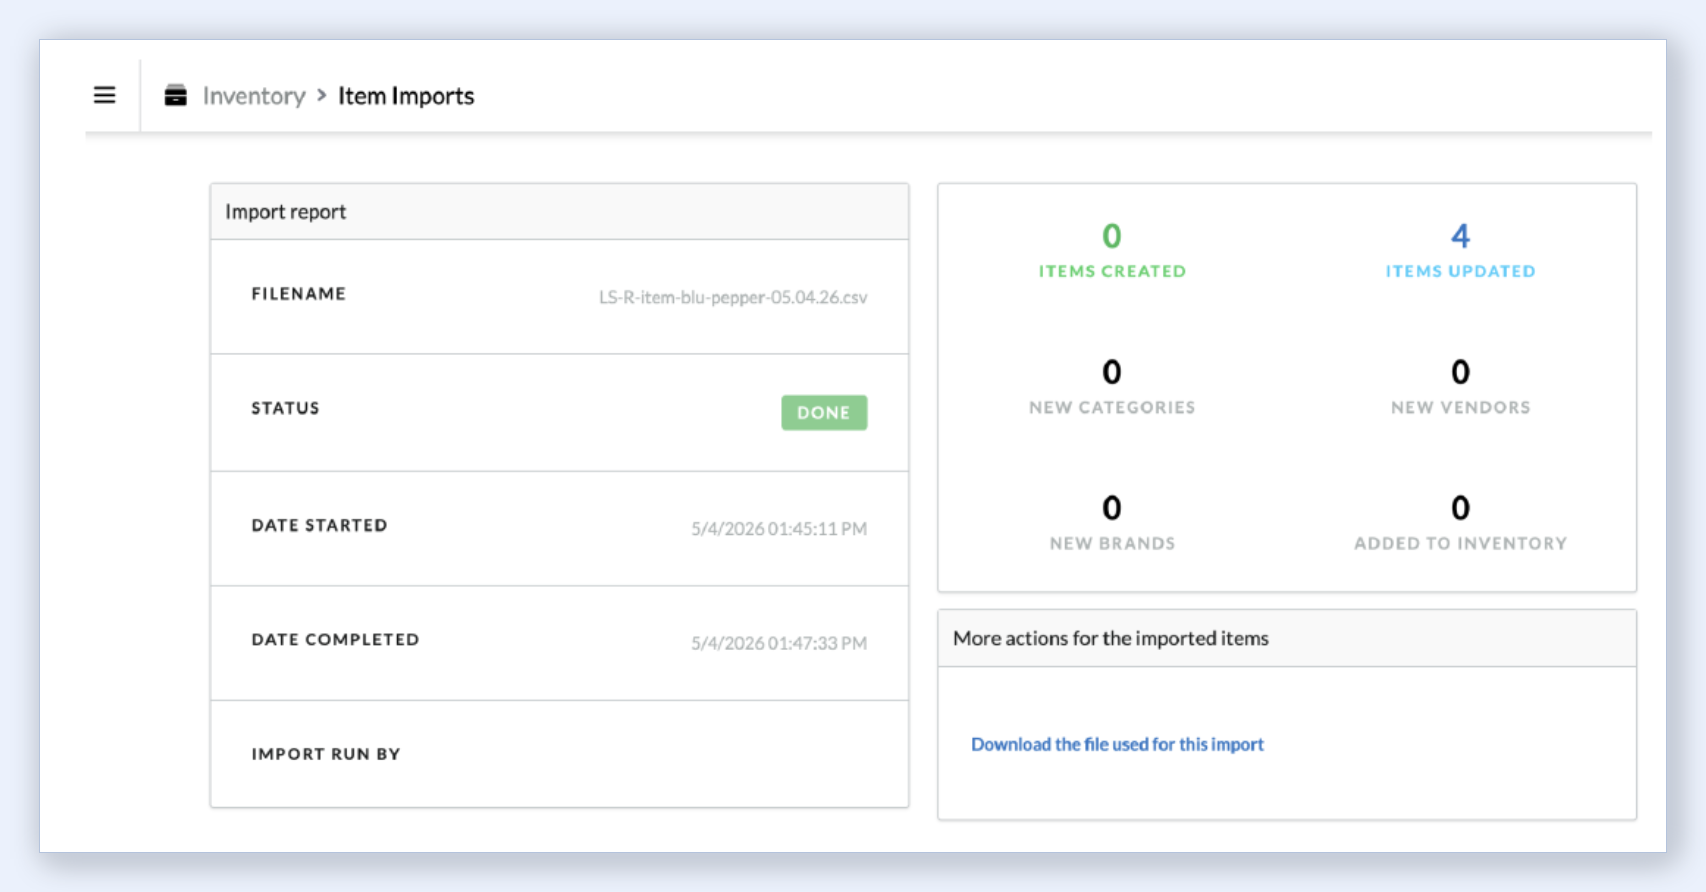
- You will see a confirmation screen with a status of Done and a breakdown of how many items were created versus updated.
That handles the catalog side. Your items now exist in Lightspeed with names, SKUs, and retail prices. But they don't have quantities or wholesale costs yet. That is what Step 2 is for.
Step 2: The Purchase Order Import Template
The Purchase Order CSV imports costs, quantities, and vendor details into a PO. This is how Lightspeed tracks what you ordered from your supplier, what each unit cost you, and (once you receive the shipment) how much stock is on hand.
Key columns
| Column | What it does |
|---|---|
| Order Qty | How many units you ordered from the supplier. |
| Unit Cost | Wholesale cost per unit. |
| System ID | Links each PO line item to the catalog item you created in Step 1. |
| Vendor ID | The vendor's identifier in Lightspeed. |
| UPC / EAN | Barcode numbers, if applicable. |
| Custom SKU | Your SKU, for reference during import. |
| Manufacturer SKU | The vendor's SKU. |
| Description | Product name, for reference during import. |
| Price | Retail price (can update the catalog price if it differs from Step 1). |
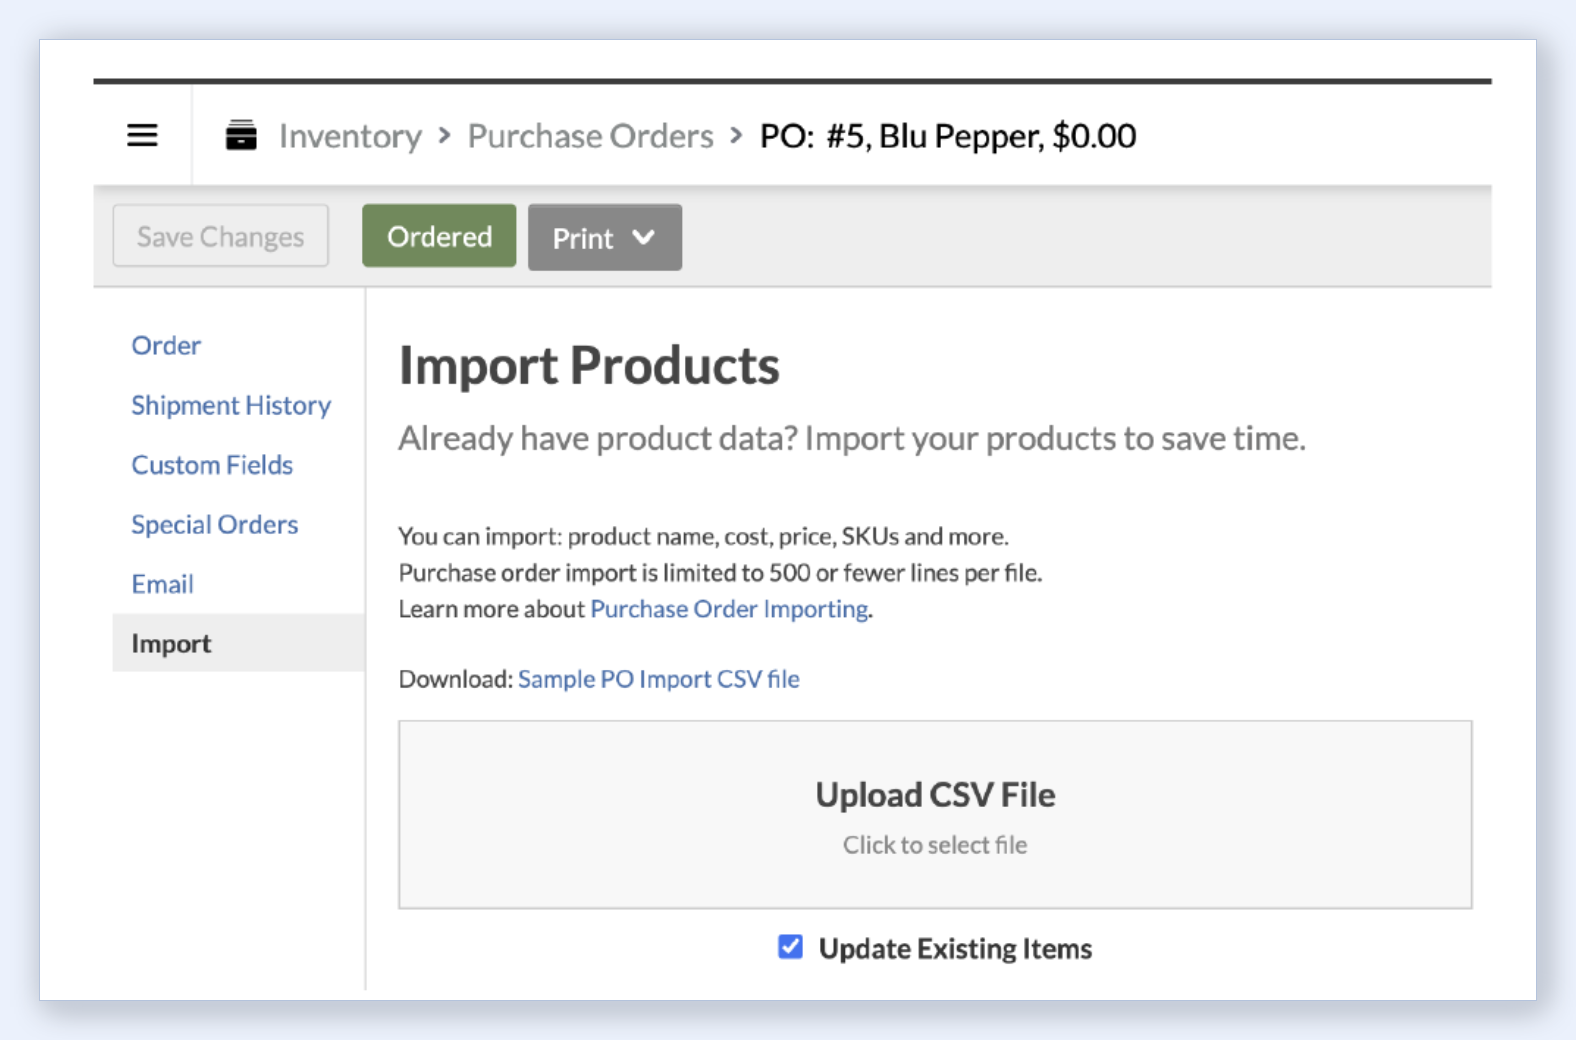
PO imports are limited to 500 lines per file.
How to import
- Go to Inventory > Purchase Orders
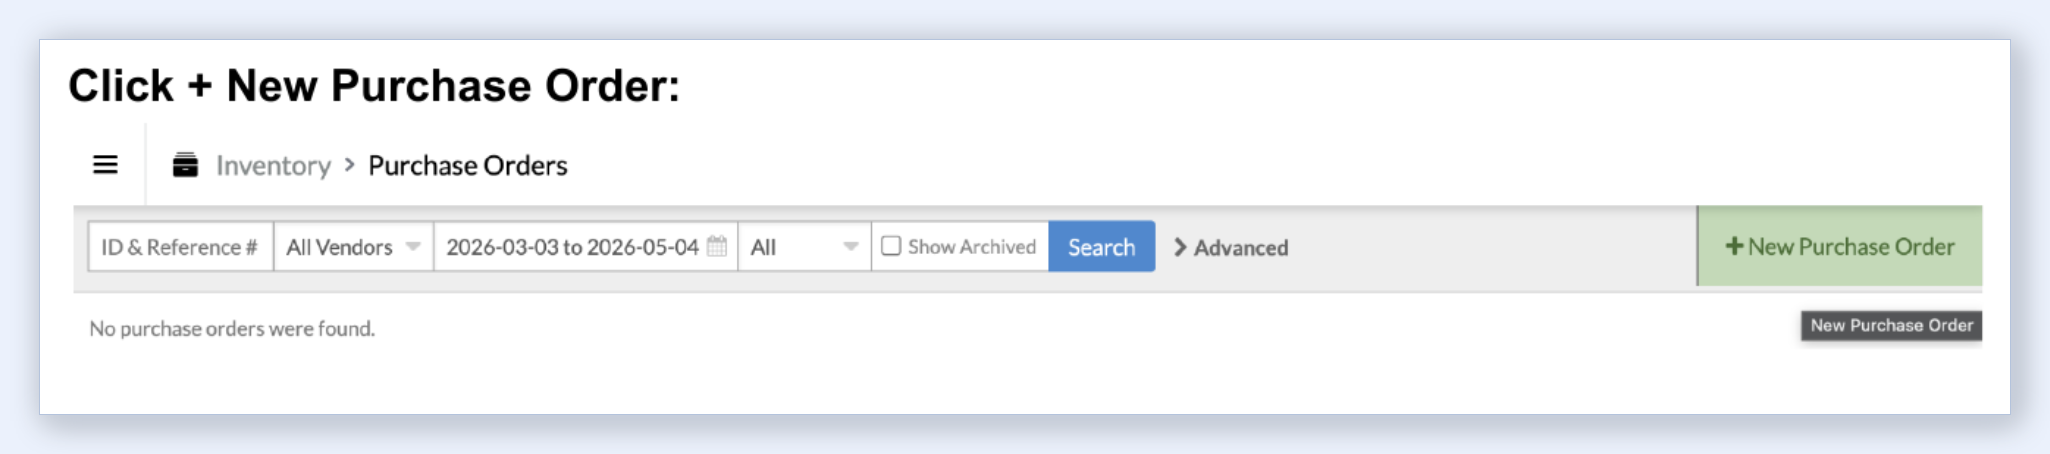
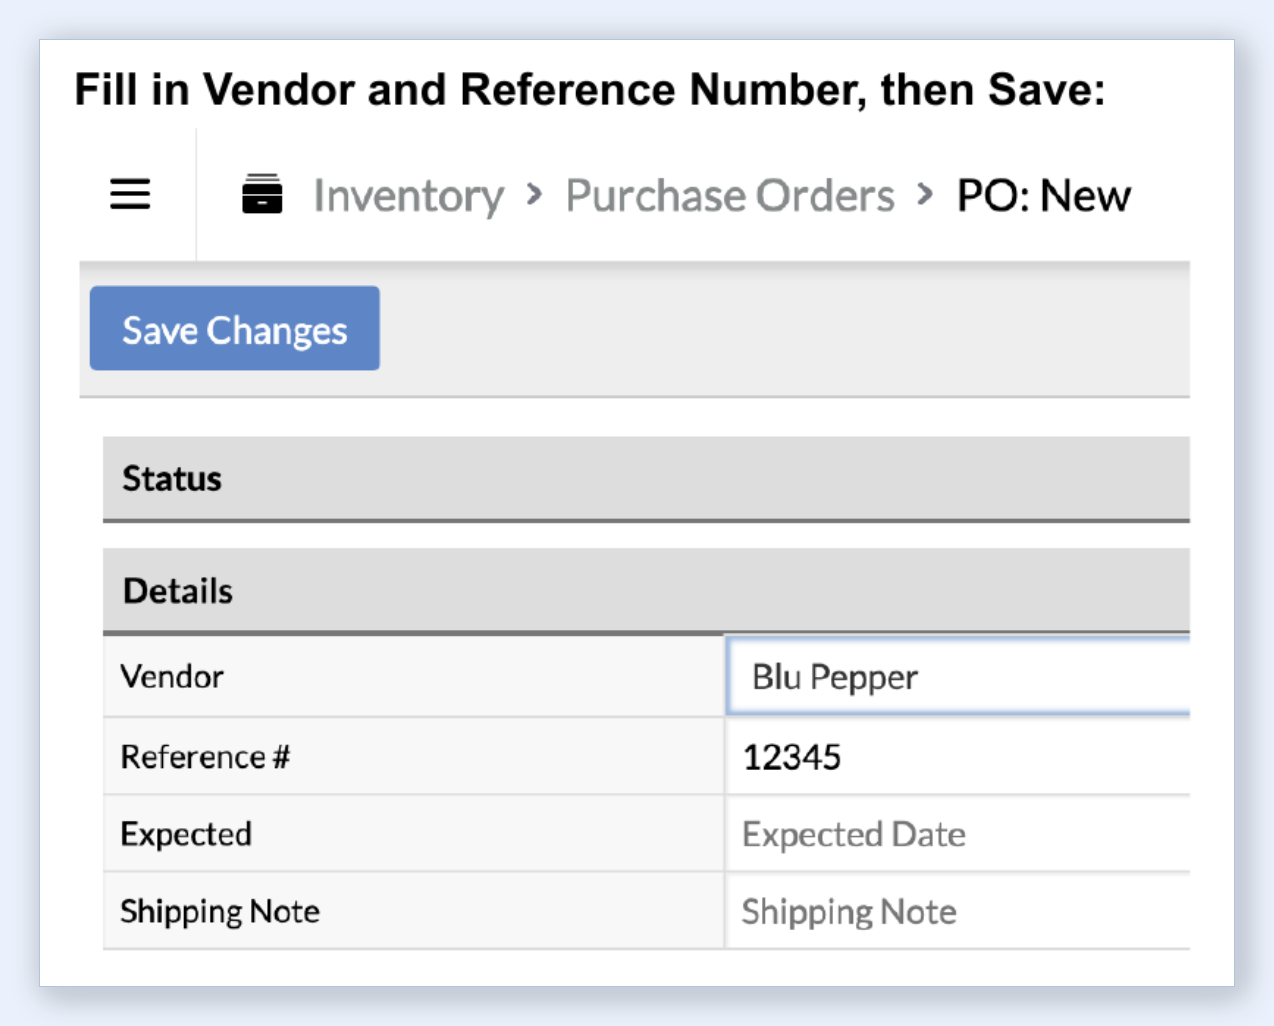
- Click + New Purchase Order
- Fill in the Vendor name and a Reference Number (your PO number or invoice number), then click Save Changes.
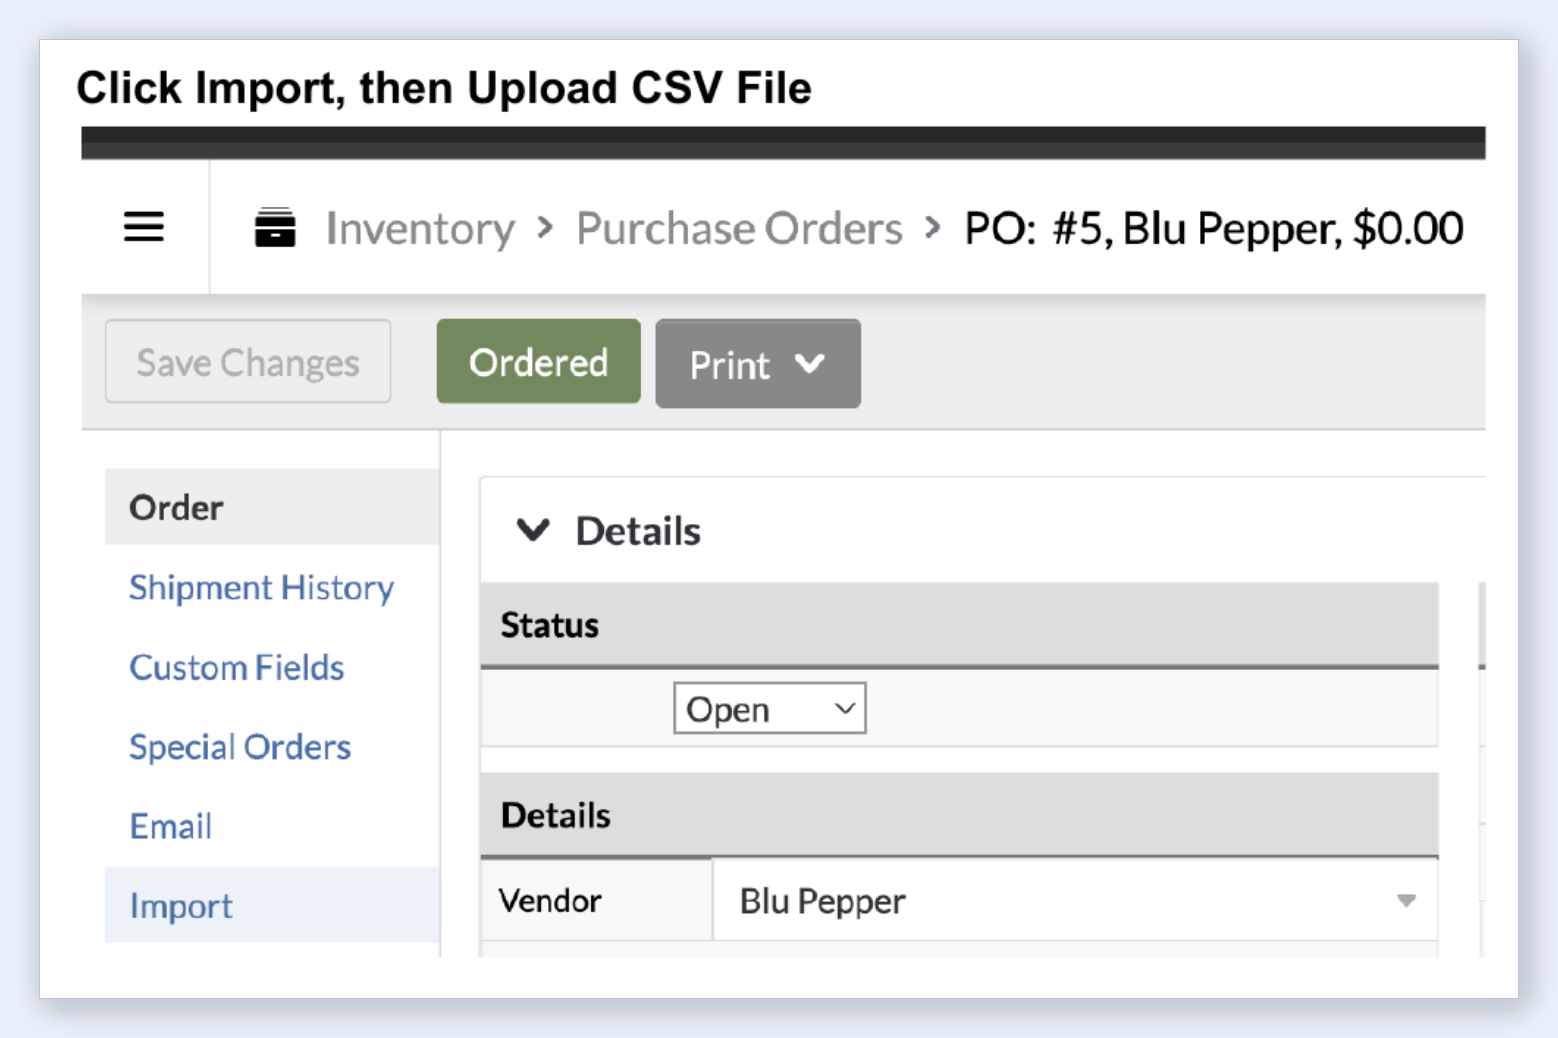
- Click the Import tab in the left sidebar.
- Upload your PO CSV file. Check "Update Existing Items" so the import links to items you already created in Step 1. Ohavah names it something like
LS-R-po-vendor-name-05.04.26.csv.
- Scroll down to verify the column mappings look correct (Order Qty maps to Order Qty, Unit Cost maps to Unit Cost, and so on). Click Import Items to Purchase Order.
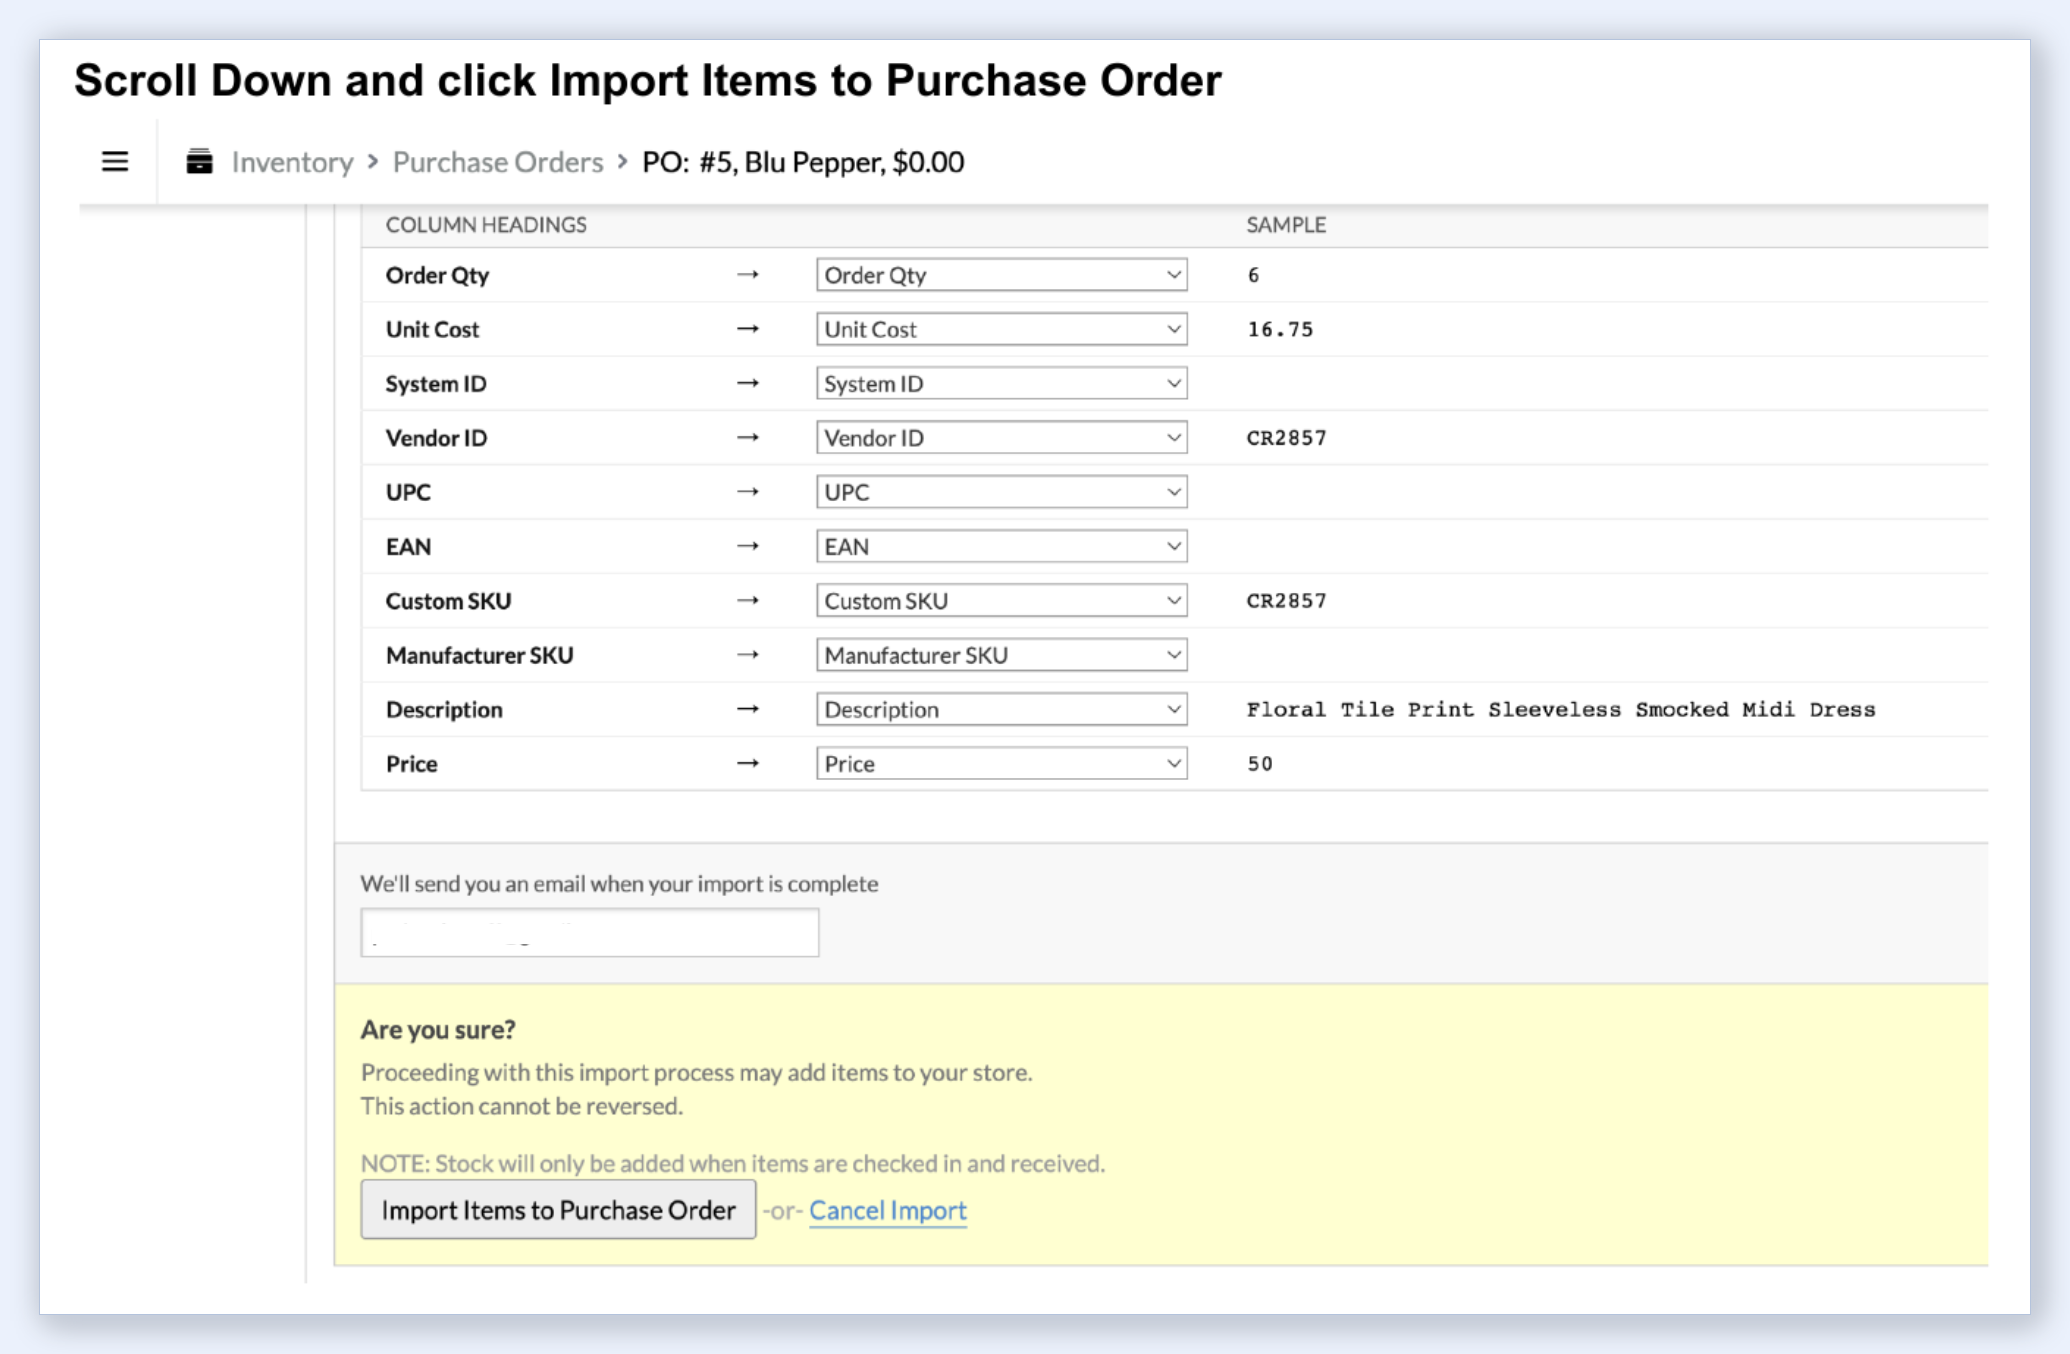
- The import will run with a progress indicator. If it appears stuck, just refresh the page after a few seconds.
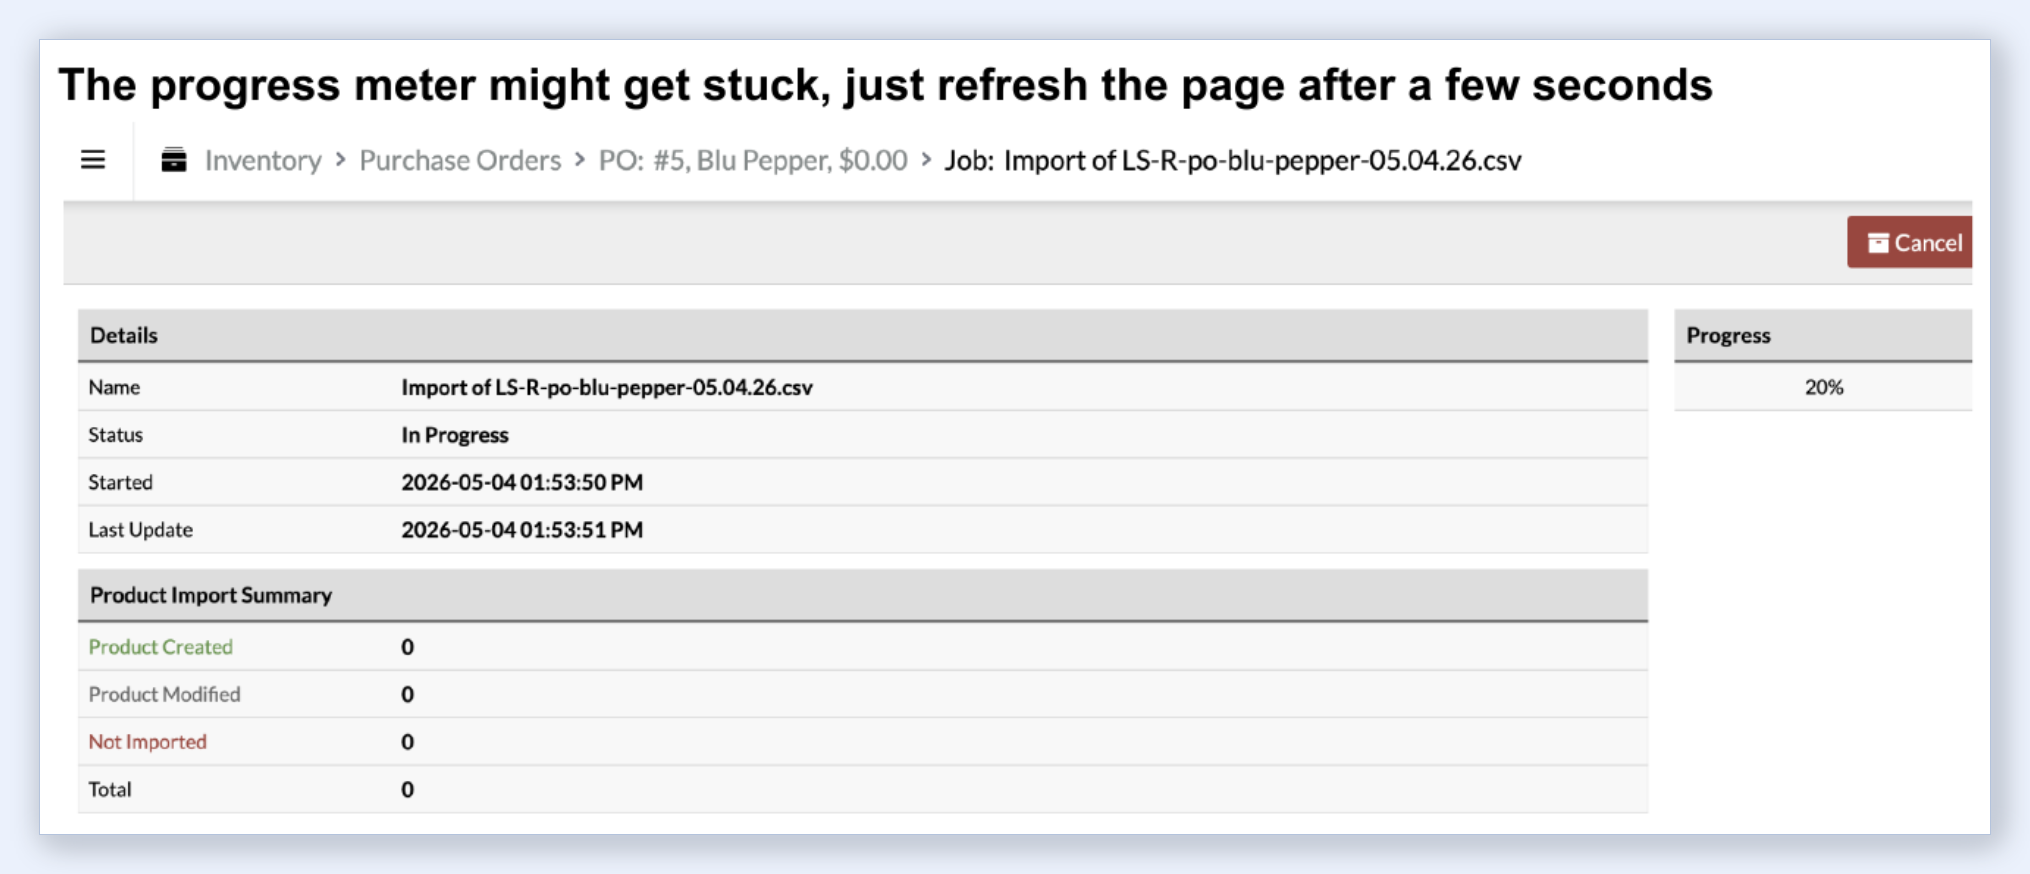
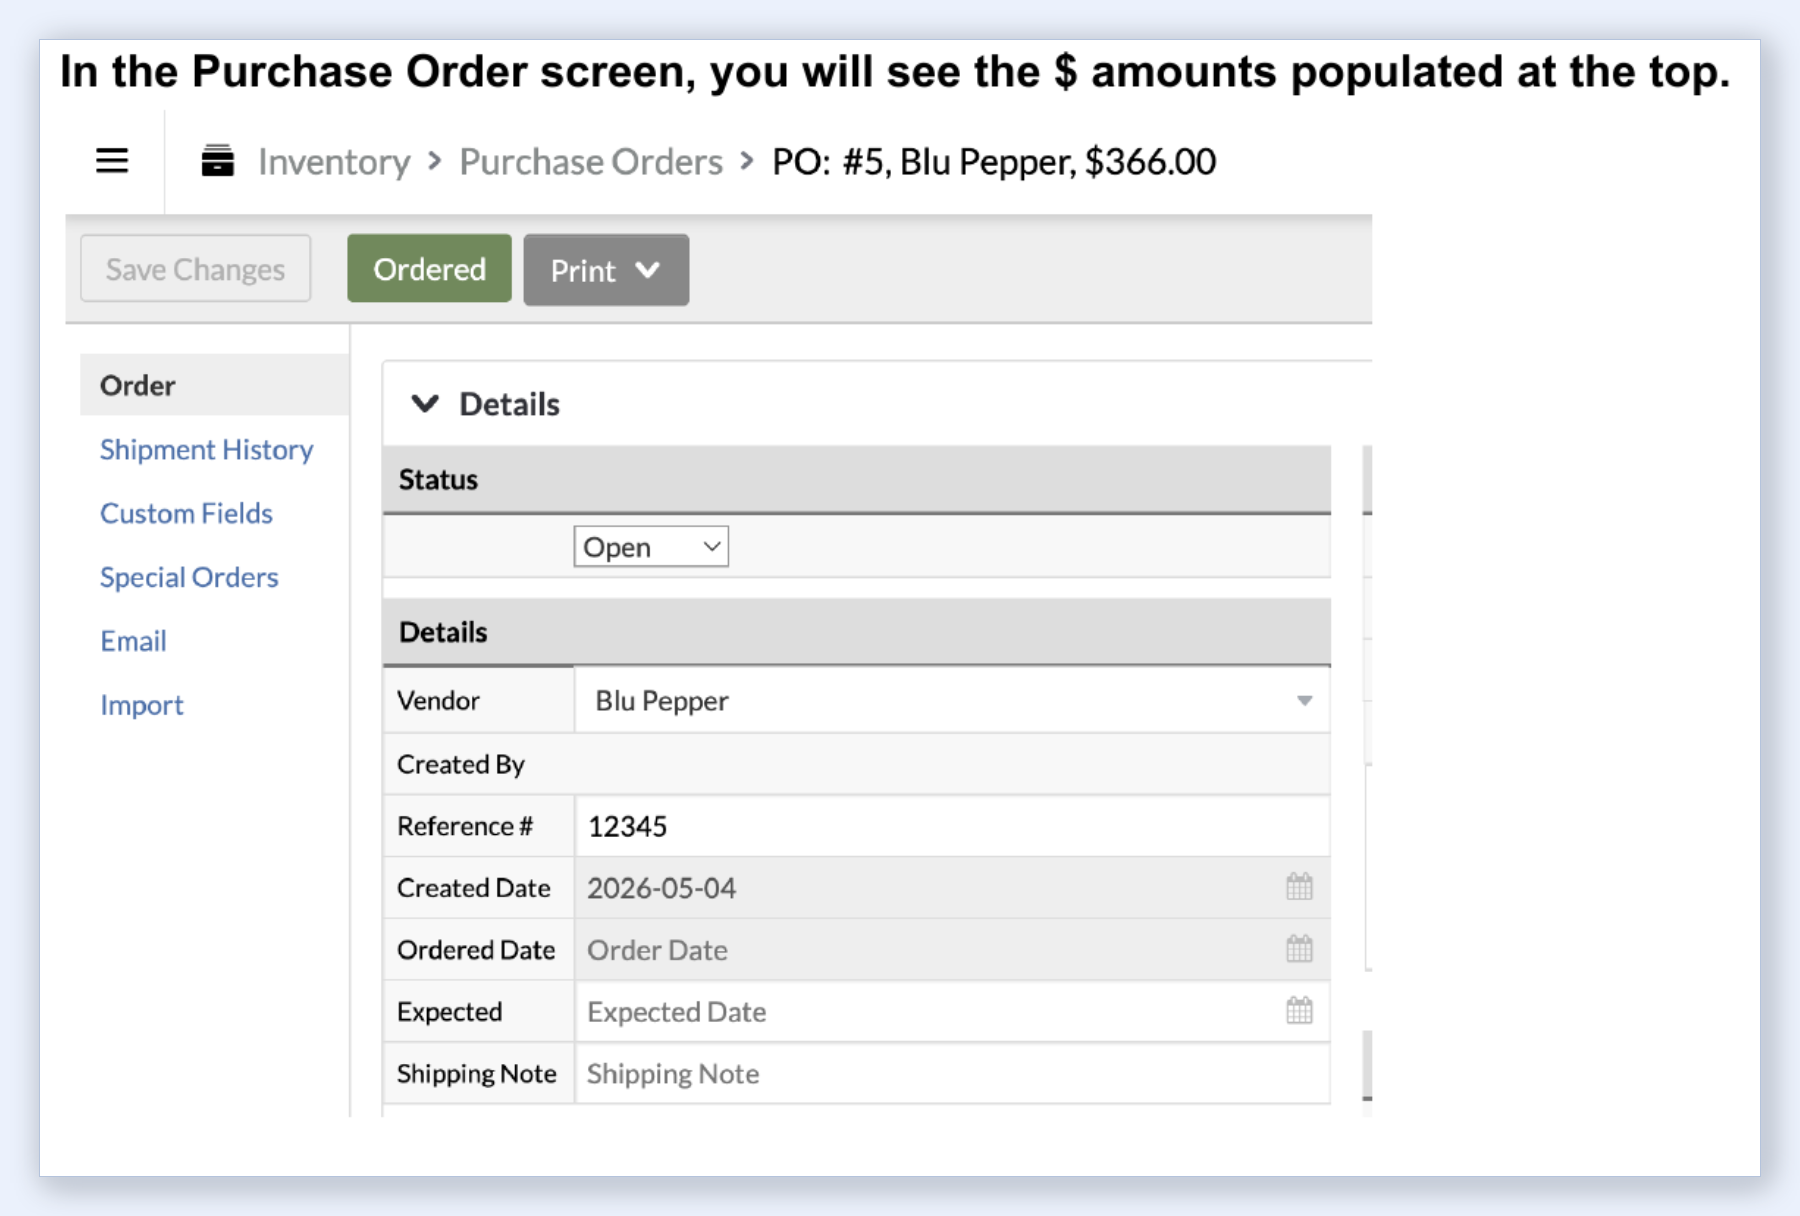
- Once complete, you will see the total dollar amount populated at the top of the purchase order.
Receiving the order
After the PO import finishes, your items have costs and order quantities on record, but the inventory is not yet "in stock." You need to receive the shipment through Lightspeed's standard receiving workflow:
- Click Ordered to mark the purchase order as placed, then click Check In and use "Receive All Items" if the full order arrived.
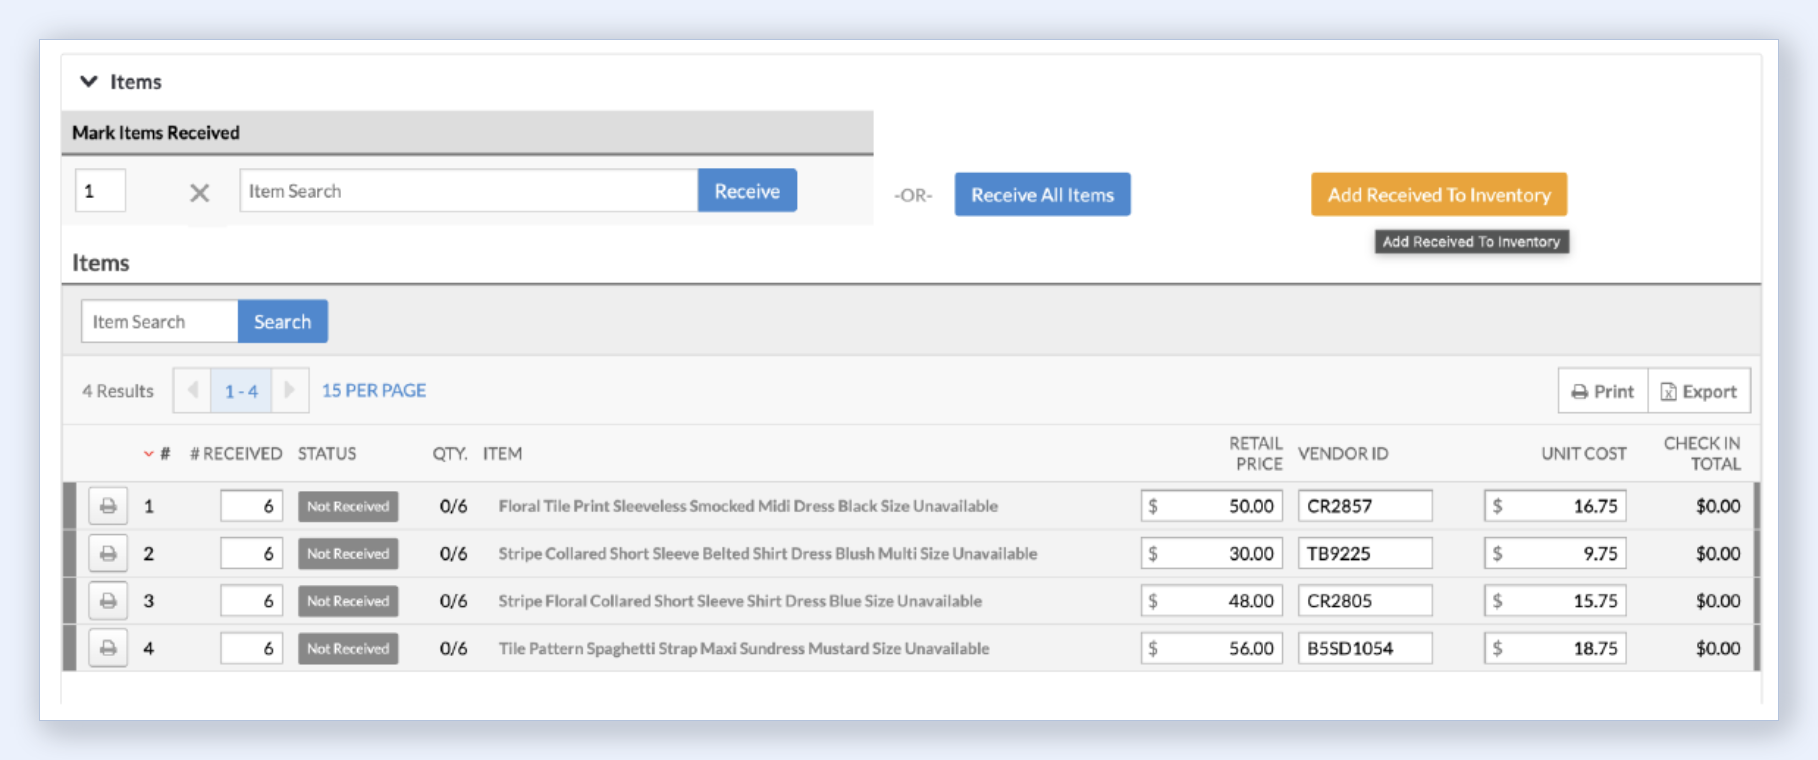
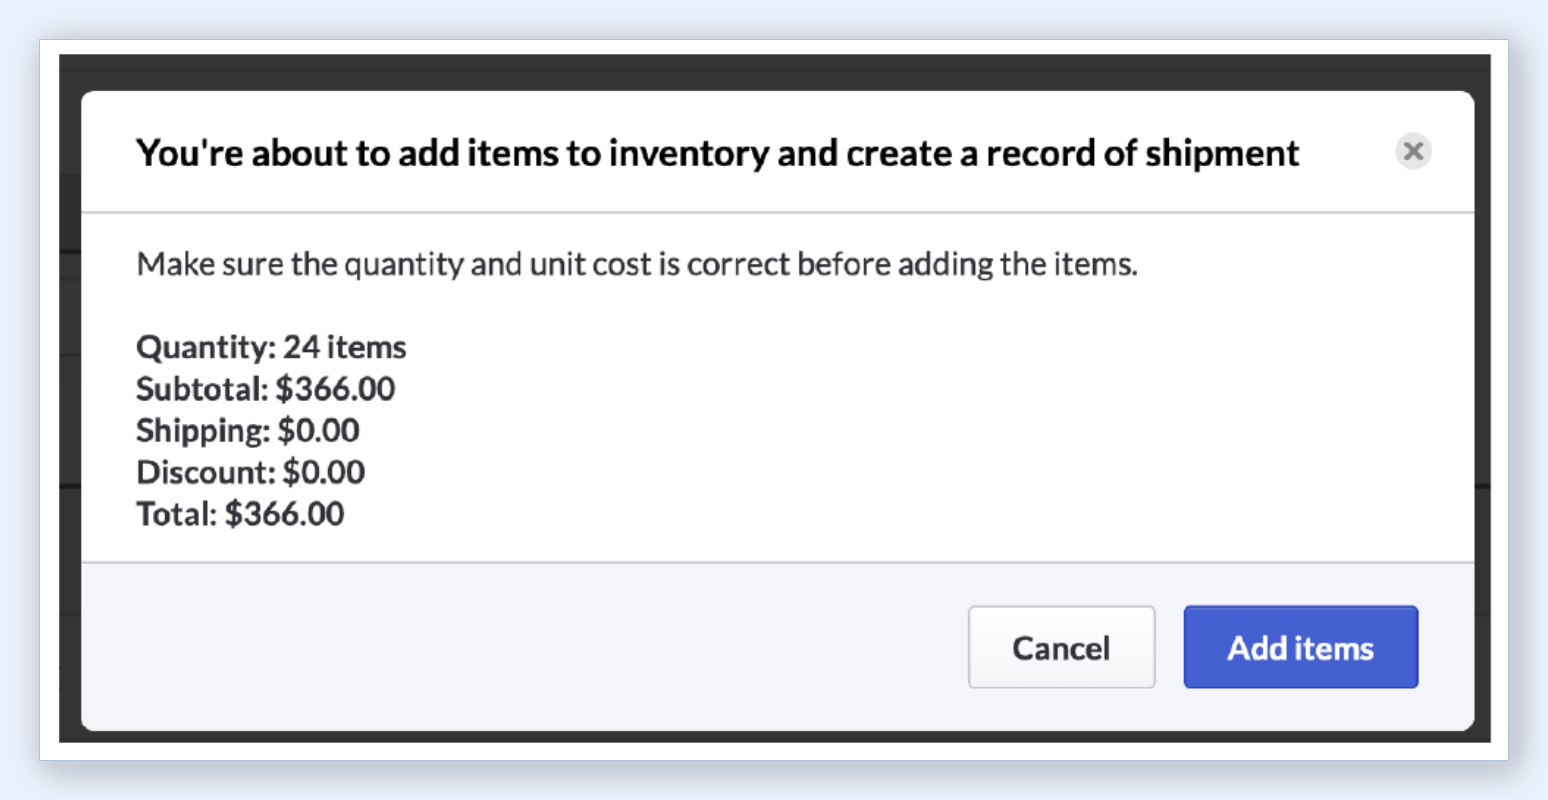
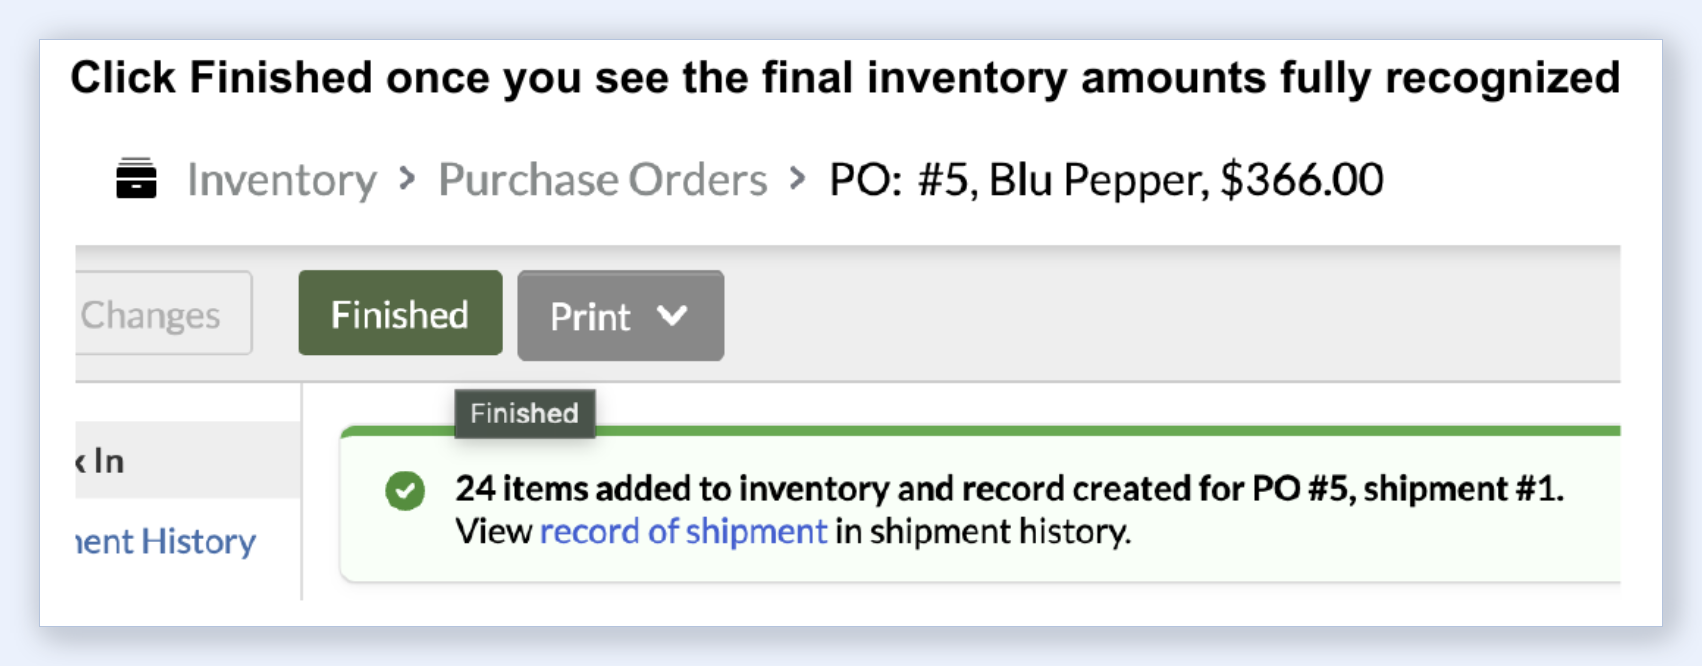
- Click Add Received to Inventory to move the items into available stock. Review the confirmation (total quantity, subtotal, shipping, discount) and click Add Items.
- Click Finished once you see the final inventory amounts.
At this point your items are fully live: in the catalog with retail prices, and in stock with quantities and cost of goods recorded.
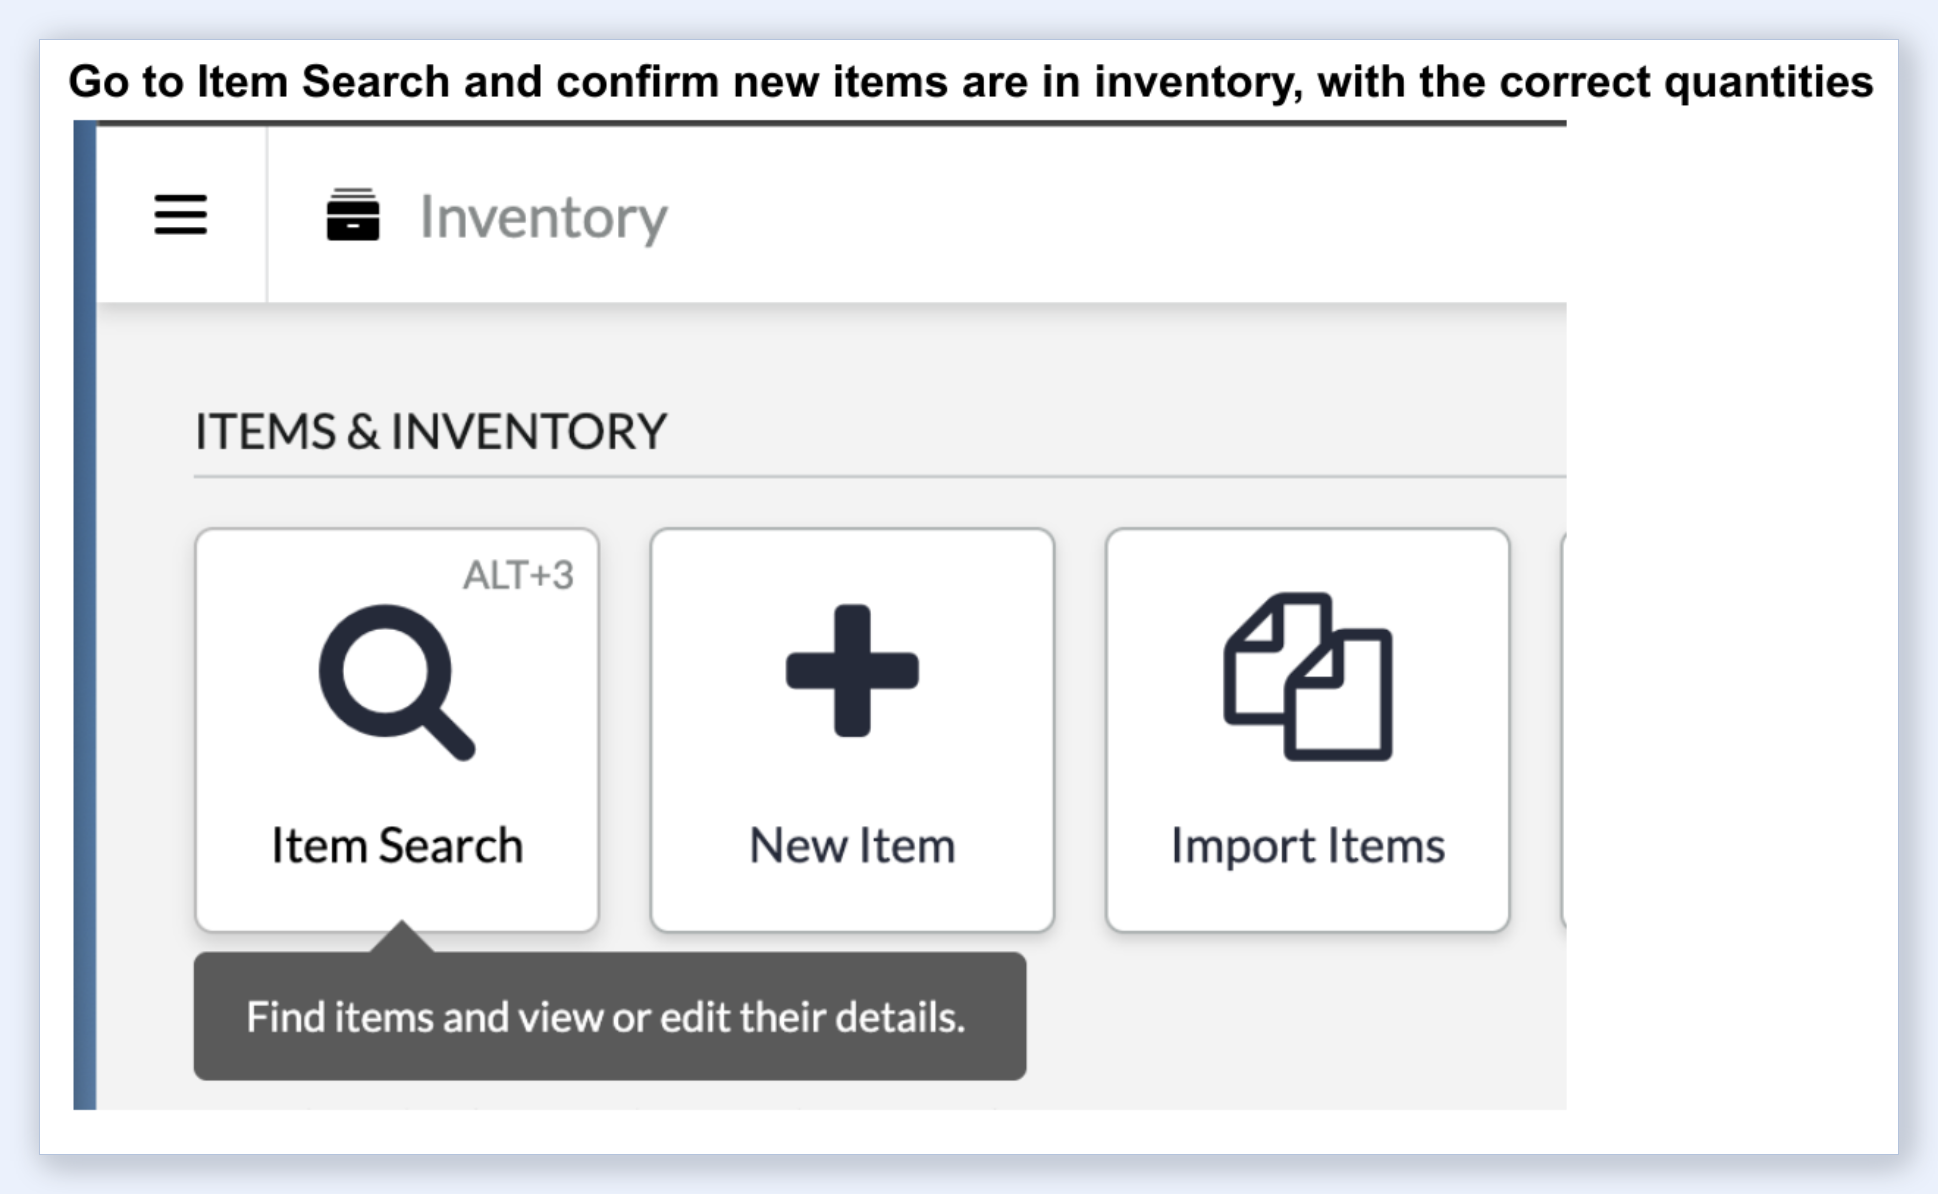
Step 3: Verify Your Inventory
Go to Inventory > Item Search and confirm your new items appear with the correct quantities, prices, and cost information. This is a quick sanity check to make sure both imports landed correctly before you start selling.
What About Lightspeed X Series?
This guide focuses on Lightspeed R Series (formerly Lightspeed Retail), which is what Ohavah supports today. X Series (formerly Lightspeed eCom) support is in the works. If you're on X Series, get in touch and we'll let you know as soon as it's ready.
Automating This With Ohavah
Building these two CSV files by hand means reading through your supplier invoice, typing product names, SKUs, sizes, colors, and costs into a spreadsheet, calculating retail prices from wholesale costs, and making sure everything maps to the right Lightspeed columns. For a typical order with 20-30 products across multiple sizes and colors, this easily takes over an hour.
Ohavah automates the entire process:
- Upload your supplier invoice or purchase order as a PDF
- Configure your vendor settings: markup multiplier, rounding rules, SKU format, and size preferences
- Download both the Item Import CSV and Purchase Order CSV, formatted and ready to upload directly into Lightspeed R Series
Ohavah's AI reads your invoice, extracts every line item, expands sizes and colors into individual rows, applies your pricing rules, and generates both CSV files in the exact format Lightspeed expects. What takes over an hour manually takes about two minutes.
If you are a boutique or specialty retailer on Lightspeed, try Ohavah and skip the spreadsheet work entirely.